hi all!
Thanks to the friendly people at Gozcodes, I now have a new site!
=> https://JohnTellsAll.com
This Blogger domain might go away at some point, so update your links.
Saturday, July 13, 2019
Sunday, March 10, 2019
Testing Pyramid and Consequences... Developer Edition this Wednesday
giving a talk this Wednesday in Santa Monica! Testing Pyramid and Consequences - for developers. I gave this talk last month to QA people who really enjoyed it!
https://www.meetup.com/testable/events/wmkmdqyzfbrb/

Thursday, February 28, 2019
Testing Pyramid vs... Testing Trophy?
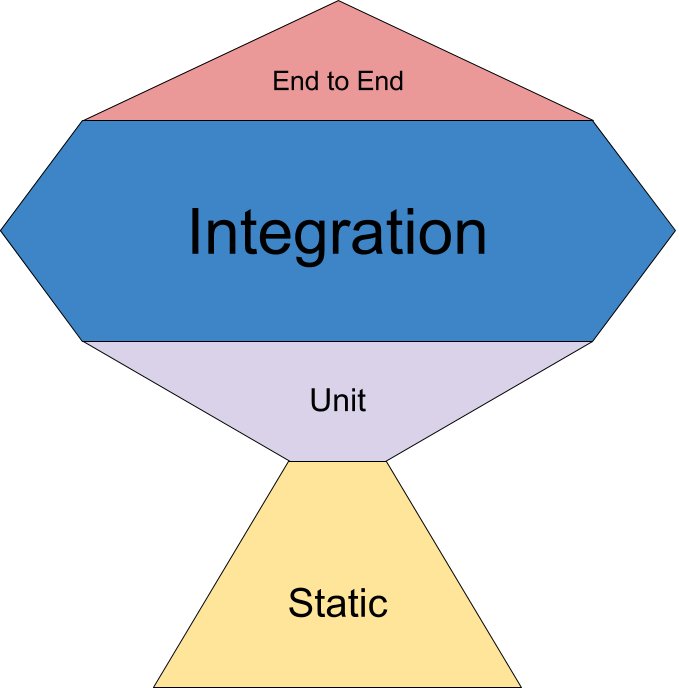
I was honored to chat to a bunch of professional QA people last night about Testing Pyramid and Consequences, details on a previous blog post. People last night seemed interested and curious in the "Testing Trophy" concept. That is, in contrast to the Testing Pyramid, tests should be mostly integration, with a few UI and unit tests. In this way we get the most business value for each test we write.
I'm a fan of the Testing Pyramid (lots of unit tests), however I'm an even bigger fan of paying really close attention to business value. Tests aren't free, and they aren't cheap! They can have bugs, and can be over-designed, so they function as "change detector" as opposed to a safety net.
From Kent C Dodds:
"Testing Trophy
A general guide for the return on investment of the different forms of testing with regards to testing JavaScript applications.
- End to end: Cypress
- Integration, Unit: Jest
- Static: Flow, ESLint"
- End to end: Cypress
- Integration, Unit: Jest
- Static: Flow, ESLint"
From @kentcdodds tweet
Sunday, February 24, 2019
new talk: Testing Pyramid and Consequences
I'm giving a new talk! This Wednesday in Pasadena for the LA Software Testing meetup, and again soon in Santa Monica at the Testable LA meetup.
The traditional testing pyramid is a useful tool for investing in tests which deliver business value... but there are a lot of subtleties. In this talk I'll highlight each area of the Pyramid, then discuss extensions and variations, so that we all can more fully deliver wonderful quality code, quickly!
Slides on google docs: Testing Pyramid and Consequences
Here's a recording from the LA Software Testing meetup.
Resources:
- Meetups: Testable LA, LA Software Testing
- Brian Okken - Test and Code podcast
- Martin Fowler - Practical Test Pyramid article
- Books: Refactoring, NoSQL Distilled
- Lisa Crispin: Agile Testing books
- Safari Online books, training videos
Wednesday, February 20, 2019
tradeoffs of having a distributed company
if y'all have a company and are considering making it mostly remote/distributed, track down talks by Mitchell "Hashicorp" Hashimoto. His co makes Vagrant and Terraform and Packer and Vault. Anyway he gave a talk in which he talked about having a mostly-distributed company. He said a lot of things were much cheaper (renting offices), but a lot of things were more expensive/awkward (per-site licensing for video equipment). Overall he called it "a wash"
Here's the talk, recorded at Replicated in Culver City, CA => https://www.youtube.com/watch?v=iV5doaYReyU
Here's the talk, recorded at Replicated in Culver City, CA => https://www.youtube.com/watch?v=iV5doaYReyU
Wednesday, November 21, 2018
importing AWS resources into Terraform
Terraform is a wonderful tool! It helps simplify DevOps work. It turns the thorny bramble of delicate networking, users, databases, and virtual machines into a simple and well-running machine. It allows us to chant "infrastructure as code" to the amusement of well-meaning technologists. Best of all: it lets us have consistent environments. A dev can wreak havoc, learn things, then create a Terraform patch that applies to the entire collection of systems, making everything just a little bit cleaner and better understood.
Terraform, although being a moderately baked and flexible tool, has a few warts. One challenge is that it doesn't play with manually-created resources very well. If you create some users in Terraform, and some users in the AWS Console, applying Terraform later will try to delete the manual users. Terraform imagines that it is the alpha and omega, and that all things are as it thinks they are.
Additionally, Terraform isn't very smart about importing manually-created resources. Traditionally we have to use a third-party tool, terraforming, to do this task. The combination of terraform (to create/update resources) and terraforming (to import manually-created resources) is useful.
Example: here's how to import all the SNS Topics ("snst") to a Terraform file:
$ AWS_PROFILE=myprofile terraforming snst --region=myregion | tee temp-sns.tf
resource "aws_sns_topic" "dynamodb" {
name = "dynamodb"
display_name = ""
policy = ...
}
Now, edit the temp-sns.tf file to make things more clear and regular, then plan and apply with Terraform as per usual.
In AWS, users aren't just users, they're defined in several different types of Identity and Access Management (IAM) resources. Here's how to import just the simple user records:
AWS_PROFILE=myprofile terraforming iamu --region=myregion | tee temp-iamu.tf
resource "aws_iam_user" "john" {
name = "john@johntellsall.com"
path = "/"
}
In practice, users aren't useful except as combined with Roles, Groups, and Policies. It's a whole thing. Fortunately, here's a bit of code which imports all AWS IAM user-related permissions into a single Terraform file:
terraforming help | egrep -o 'iam\w+' | AWS_PROFILE=myprofile xargs -I{} -t terraforming {} --region=myregion >> temp-users.tf
Now, you'll be left with a 1,000-line Terraform file for further editing. This isn't that fun, however once you're done, you can move this file into its own module, and apply the same users/groups/permissions on all your environments!
Terraform is a wonderful tool, and in combination with Terraforming and a bit of work, will make your DevOps work a lot simpler!
Subscribe to:
Posts (Atom)
